A well-designed pantry isn’t just a closet — it’s a sanctuary of abundance, a place where you can see every jar, every can, every spice at a glance. A thoughtful pantry remodel transforms chaotic shelves into a calm, efficient system that saves you money (no more buying duplicates of lost items) and reduces stress. Imagine opening your pantry door to find clear bins, labeled baskets, and neatly stacked goods — like looking out over a well-tended meadow where everything has its place and every plant thrives.
These pantry remodel ideas will guide you through every step, from ripping out wire shelves to installing custom wood shelving, from sorting by category to decanting into matching glass jars. Whether you have a walk-in pantry, a reach-in closet, a corner cabinet, or just a few shelves in a small kitchen, you’ll learn to maximize every inch. Like a garden planned with care, your new pantry will be beautiful, functional, and a joy to use every single day.
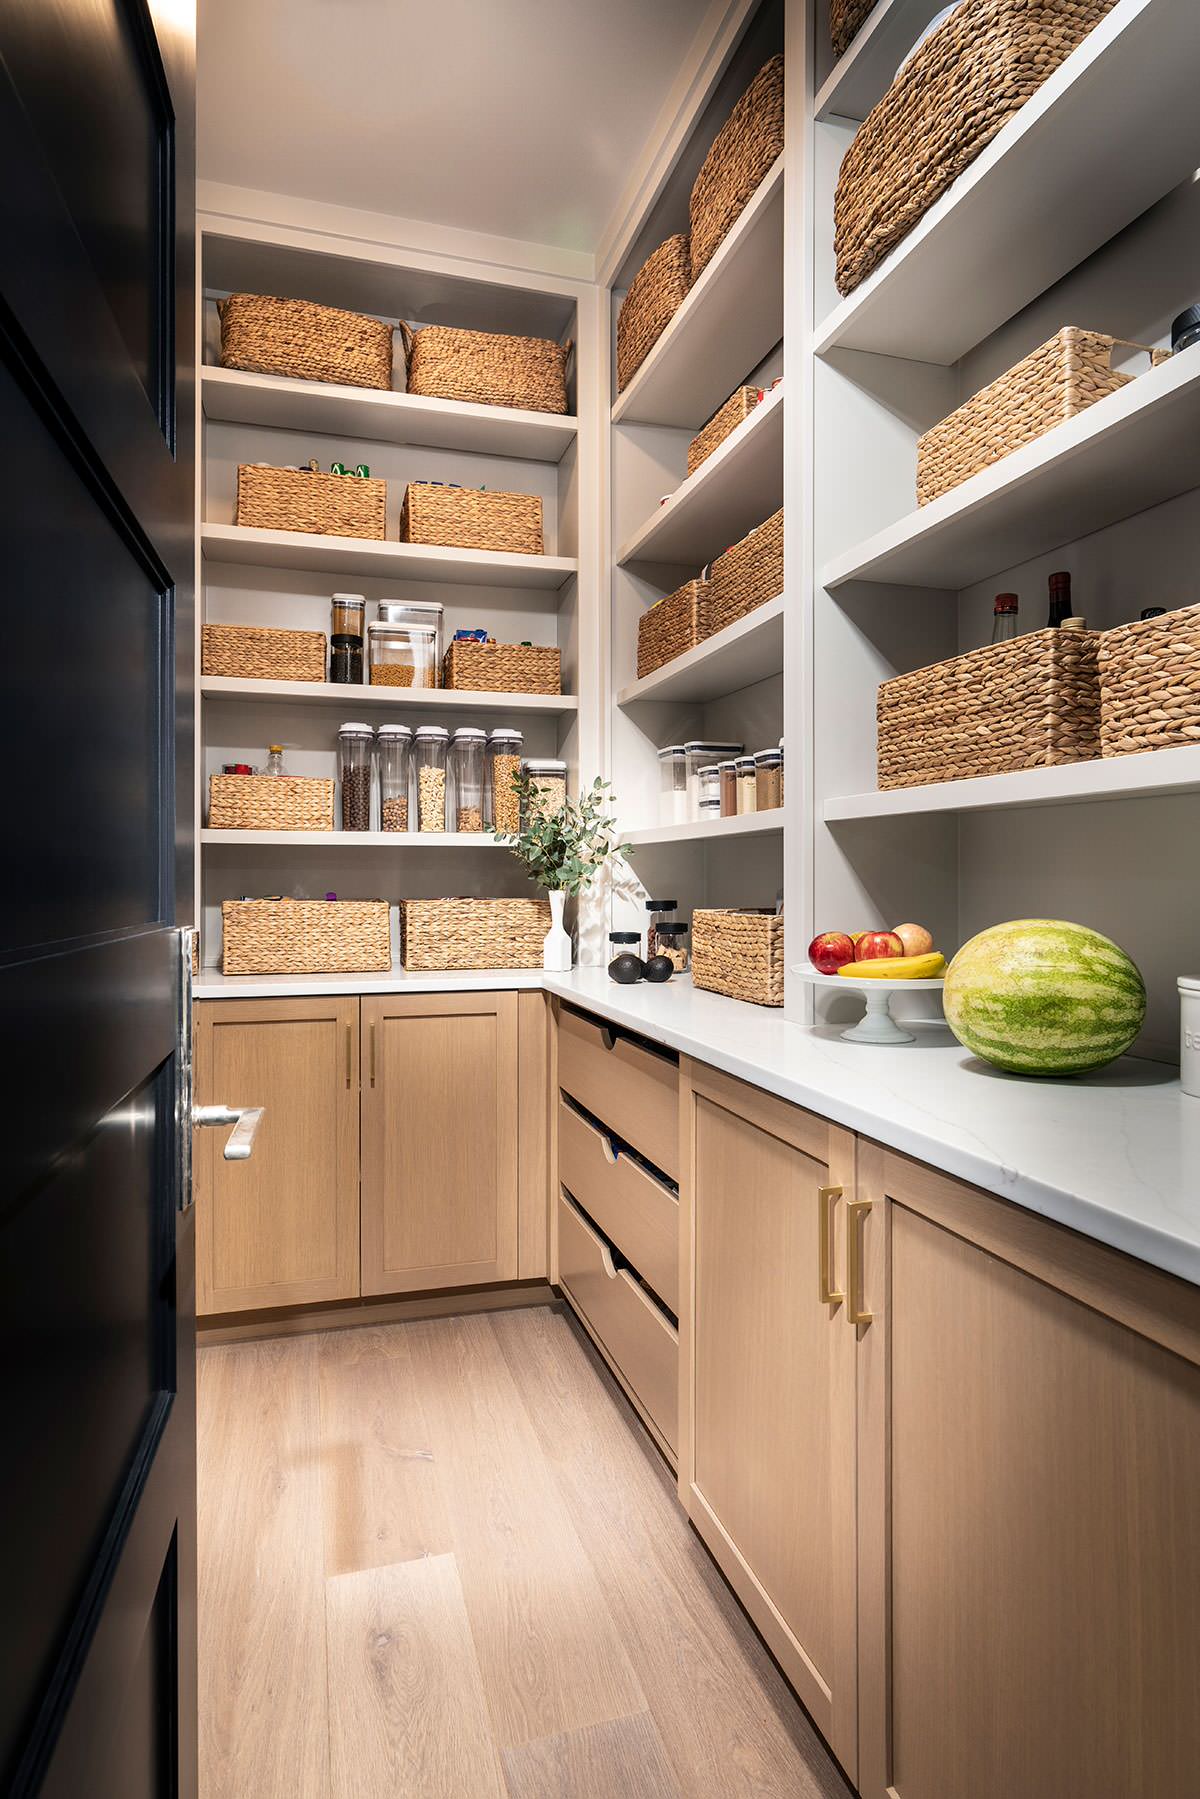
1. Basket Abundance: Woven Storage for a Warm, Natural Look
Replace plastic bins with woven baskets on your pantry shelves, creating a warm, organic feel while hiding snack bags and loose items. This pantry remodel trick adds texture and makes your pantry feel like a high-end farmhouse market. You’ll love how the baskets soften the look of packaged foods, turning functional storage into a design feature.
Baskets are a powerhouse in any pantry remodel. Use them for chips, snack bars, baking supplies, and root vegetables. Choose baskets in a consistent material (seagrass, rattan, or water hyacinth) and size family. Label each with a chalkboard tag or a simple piece of twine and paper. The woven texture creates visual rhythm, like rows of wild grasses swaying in a meadow breeze.
2. Glass Jar Clarity: Decant Dry Goods for Beauty & Freshness
Decant flour, sugar, rice, pasta, and beans into uniform glass jars with airtight lids, creating a stunning visual pantry. This pantry remodel technique keeps food fresher longer and lets you see exactly when you’re running low. You’ll appreciate how the rainbow of grains and legumes becomes a living work of art, each jar a tiny still life.
Clear glass jars are a hallmark of a successful pantry remodel. Use wide-mouth quart and half-gallon jars for most dry goods. Add a scoop to each flour jar. Arrange jars by color or type — all white grains together, all red beans together. The transparency eliminates the “what’s in this bag?” guessing game and makes shopping list creation instant.
3. Category Zones: Group Like with Like for Instant Access
Divide your pantry into clear zones: baking, breakfast, canned goods, pasta, snacks, drinks. This foundational pantry remodel principle saves time and reduces frustration. You’ll love how easy it becomes to find the tomato paste or the coffee filters when every category has a designated shelf or basket.
Zone planning is the first step of any pantry remodel. Before you buy a single bin, empty your pantry and sort everything into piles: baking, breakfast, canned, grains, snacks, drinks, etc. Then decide where each zone will live based on frequency of use — daily items at eye level, weekly items lower, bulk items on the highest or lowest shelves. The zones become a map, and a mapped pantry is an efficient pantry.
4. Corner Victory: Making an Awkward Nook Work Hard
Install pull-out shelves or a lazy Susan in a corner pantry, turning dead space into accessible storage. This clever pantry remodel trick solves the problem of lost items in dark corners. You’ll appreciate how the rotating shelves bring everything to you, like a carousel of abundance.
Corner pantries are often underutilized in a pantry remodel. Use sliding baskets, swing-out shelves, or a two-tier lazy Susan. Store canned goods, jars, and bottles — items that can rotate without spilling. The goal is to eliminate the deep, dark hole where food goes to expire. With the right hardware, every corner becomes usable.
5. Uniform Containers: The Ultimate Cohesive Look
Invest in a full set of matching food storage containers — all the same material (glass or acrylic), all the same shape (square for space efficiency), all the same lid. This premium pantry remodel upgrade creates a stunning, uniform display. You’ll feel like you’re in a fancy cooking store every time you open your pantry.
Uniform containers are the most visually satisfying element of a pantry remodel. Measure your shelves before buying. Choose containers that stack neatly. Square containers fit together without wasted space. Use chalkboard labels or a label maker for clear identification. The repetitive shapes and consistent material calm the eye, turning chaos into a minimalist masterpiece.
6. Start Fresh: The Complete Pantry Empty-Out
Begin your pantry remodel by completely emptying the space, wiping down every shelf, and checking expiration dates. This cathartic process reveals what you actually use (and what you’ve forgotten). You’ll be amazed at how much space is reclaimed by discarding stale spices, half-empty bags, and cans from 2019.
A complete purge is the most important first step of any pantry remodel. Toss anything expired, stale, or forgotten. Donate unopened non-perishables you won’t eat. Group remaining items by category. Take note of what you have too much of (how many half-empty bags of chocolate chips?) and what you’re missing. A clean slate is the foundation for lasting order.
7. DIY Wood Shelving: Customize Your Space
Replace wire or plastic shelving with custom-cut wood shelves for a warmer, sturdier pantry. This pantry remodel upgrade can be a DIY weekend project. You’ll love how the natural wood grain adds warmth and how adjustable shelf pins let you customize heights for cereal boxes, tall bottles, and short cans.
Wood shelves are a game-changer in a pantry remodel. Use 3/4-inch plywood or solid pine. Sand and seal with a food-safe finish (water-based polyurethane). Install standards and brackets for adjustability. Wood is stronger than wire, so no more sagging. The natural beauty makes even a simple pantry feel like a custom piece of furniture.
8. First In, First Out: The FIFO Shelf
Designate one shelf or bin system for “first in, first out” — place new items at the back, pull older items from the front. This restaurant-inspired pantry remodel trick dramatically reduces food waste. You’ll appreciate how a simple can dispenser or slanted shelf ensures you use the oldest beans before buying fresh ones.
FIFO is a mindset as much as a tool in pantry remodel. Use a tiered shelf for canned goods. Label bins with expiration dates visible. When you buy groceries, move older items forward and place new ones behind. The system works even without special hardware — just conscious stacking. Your wallet and the planet will thank you.
9. Lazy Susan Layers: Double Corner Capacity
Install a two-tier lazy Susan on a deep pantry shelf to double your access to oils, vinegars, and spice jars. This rotating pantry remodel hero brings the back to the front with a simple spin. You’ll love how no bottle gets lost in the dark depths again, and how satisfying it is to spin the turntable to find exactly what you need.
Lazy Susans are unsung heroes of pantry remodel for corner cabinets and deep shelves. Use one for oils and vinegars, another for baking extracts, a third for small jars. The stacked two-tier version is especially space-efficient. Choose ones with raised edges to prevent spinning items from falling. Your pantry will feel like a diner counter, but in the best way.
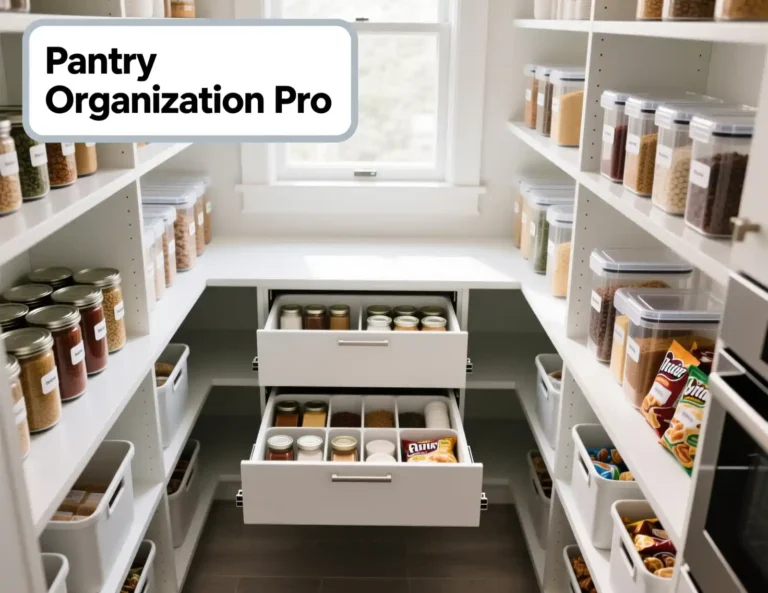
10. Pull-Out Drawers: Cabinet Convenience in a Pantry
Replace lower pantry shelves with pull-out drawers on heavy-duty slides, so you can see and reach everything without kneeling. This luxury pantry remodel upgrade is life-changing for anyone with back pain or mobility issues. You’ll appreciate how a full-extension drawer reveals every single can and jar at a glance, like opening a treasure chest of ingredients.
Pull-out drawers maximize the usability of lower pantry space. In a pantry remodel, use them for heavy items (canned goods, glass jars) and bulk bags. Add dividers to keep items from shifting. Measure carefully before ordering drawer slides. The cost is higher than fixed shelves, but the accessibility is priceless. No more digging in dark corners.
11. Door-Mounted Racks: Use Every Inch
Mount over-the-door wire racks on the inside of your pantry door for spices, snack pouches, or small cans. This zero-floor-space pantry remodel trick instantly adds storage. You’ll love how the door, once wasted, becomes prime real estate for lightweight, frequently used items — like a vertical garden of cooking essentials.
Door racks are a secret weapon in pantry remodel. Use a wire rack with adjustable shelves for spice jars. Use a clear pocket organizer for seasoning packets, drink mixes, or snack bars. Ensure the rack doesn’t hit the shelves when the door closes. The door becomes an extra wall of storage, turning a narrow pantry into a surprisingly spacious one.
12. Adjustable Shelving: Adapt to Your Changing Needs
Install adjustable shelving tracks and brackets, allowing you to move shelf heights as your storage needs change. This flexible pantry remodel choice accommodates everything from tall cereal boxes to short spice jars. You’ll appreciate how a quick shelf adjustment can accommodate a Costco run or a bulk flour purchase without rearranging your entire system.
Adjustable shelving is the most versatile pantry remodel option. Use metal standards and brackets, then cut your own wood shelves. Arrange shelves so there’s no wasted vertical space — tall items get tall slots, short items get short slots. As your family grows or your cooking habits change, move shelves accordingly. A flexible pantry is a forever pantry.
13. Tension Rod Dividers: Keep Bins from Sliding
Place small tension rods vertically between upright items — cutting boards, baking sheets, or tall bottles — to keep them from falling over. This penny-wise pantry remodel hack uses tension rods you may already own. You’ll love how the rods act like bookends for your pantry, creating neat, upright rows like soldiers standing at attention.
Tension rods are an unexpected hero of pantry remodel. Use them between dividers to corral baking sheets and cutting boards. Use them at the edge of a shelf to keep jars from rolling off. Use them inside a cabinet door to hold spray bottles. They cost very little but solve a surprisingly wide range of organization problems.
14. Label Everything: The Visibility Key
Add clear, consistent labels to every bin, basket, and jar in your pantry. This simple pantry remodel habit ensures everyone in the family can find and return items correctly. You’ll appreciate how a chalkboard label or a crisp white sticker eliminates the “where does this go?” question and maintains your hard-won order.
Labels are the final, essential step of any pantry remodel. Use a label maker for a professional look, or chalkboard stickers for a farmhouse feel. Label bins by category (“Snacks,” “Baking,” “Pasta”), jars by contents (“Rolled Oats,” “Quinoa”), and shelves by zone (“Breakfast,” “Canned Goods”). Labels turn your pantry from a secret only you know into a system everyone can use.
15. Clear Bins for Small Packets: Tame the Chaos
Corral gravy packets, taco seasoning, drink mixes, and sauce packets in small, clear acrylic bins. This targeted pantry remodel fix prevents those small items from spreading across your shelves like scattered seeds. You’ll love how one bin contains all the “little things” that used to get lost in the back, each packet visible through the clear plastic.
Small-packet chaos is one of the most common complaints before a pantry remodel. Use 4×6 inch or 6×9 inch clear bins. Sort by type: one bin for taco seasonings, one for gravy mixes, one for drink pouches. Keep bins on a shelf at eye level. The transparency means you can see at a glance when you’re running low. No more buying a second packet because you couldn’t find the first.
16. Step Riser Shelves: Stadium Seating for Canned Goods
Place clear acrylic step risers on your pantry shelves to create stadium-style seating for canned goods. This affordable pantry remodel trick shows every label in a row, with nothing hidden behind the first row. You’ll appreciate how a quick scan reveals your entire canned goods inventory, making grocery list creation instant.
Step risers are a small investment with huge returns in a pantry remodel. Use them for soup cans, tomato products, beans, and tuna. The stepped rows mean you use the oldest cans first (they’re in the front). The risers also work for small jars and spice tins. The visual clarity is deeply satisfying and saves money by preventing duplicate purchases.
17. Drawers Inside Pantry: Deep Storage, Easy Access
Install full-extension drawers on the lower half of your pantry, reserving upper space for shelves. This hybrid pantry remodel design gives you the best of both worlds — shallow drawers for baking supplies, deep drawers for bulk bags. You’ll love how the drawers slide out to reveal every single item, with nothing lost in the back.
Drawers in a pantry are a premium pantry remodel feature. Use shallow drawers (4-6 inches tall) for seasoning packets, tea bags, and small tools. Use medium drawers (8-10 inches) for canned goods and jars. Use deep drawers (12+ inches) for bulk flour and rice. Add dividers or pegboard inserts to keep items from shifting. The ergonomic benefit of pulling out a drawer rather than reaching into a dark shelf is immense.
18. Countertop Extension: A Folding Shelf for Prep
Mount a folding wooden shelf on your pantry wall that folds down when you need a staging area for meal prep. This space-saving pantry remodel addition is perfect for small kitchens with no counter space. You’ll appreciate how the shelf folds flat against the wall when not in use, disappearing like a secret compartment.
A drop-leaf shelf in a pantry is a clever pantry remodel idea for tight spaces. Install it at a convenient height (36 inches). Use it to hold grocery bags while you unload, to stage multiple cans before cooking, or as a small baking station. When folded, it takes up just 2 inches of wall space. The shelf turns your pantry into a multi-functional room.
19. Vertical Dividers for Baking Sheets & Cutting Boards
Insert wooden or wire dividers on a deep shelf to create vertical slots for baking sheets, cutting boards, and cooling racks. This organized pantry remodel solution prevents the dreaded leaning tower of sheet pans. You’ll love how the dividers turn a chaotic pile into a neat filing system, each pan sliding out like a book from a library.
Vertical dividers are a low-cost, high-impact pantry remodel project. Use half-sheet pan racks designed for cabinets, or make your own with small tension rods or wooden slats. Store baking sheets, muffin tins, and cutting boards on their edges. The dividers keep them upright and accessible. No more clattering avalanches when you reach for the jelly roll pan.
20. Snack Basket System: Controlled Access for Kids
Designate a lower shelf with clear bins filled with portioned snacks — goldfish, granola bars, fruit pouches — that children can reach independently. This family-friendly pantry remodel idea teaches kids to make their own choices while keeping the rest of the pantry organized. You’ll appreciate how the snack zone empowers kids and reduces requests for help.
A snack station is a game-changer in a family pantry remodel. Use low, open bins so small hands can see and reach. Stock with healthy options. Teach children to take one snack at a time. The autonomy saves you from constant snack requests and teaches responsibility. The rest of your pantry stays adult-height and adult-controlled.
21. Bulk Bin Storage: Bagged Goods Neatly Contained
Store bulk items — 10-pound bags of flour, giant boxes of pasta — in matching lidded bins on lower shelves. This pantry remodel solution keeps pests out and the pantry looking uniform. You’ll love how the bins hide unsightly bulk packaging while keeping the contents fresh, like storing hay in a barn but much prettier.
Bulk storage is often overlooked in pantry remodel planning. Use dog food bins (new, unused) for flour and sugar. Use large square bins with locking lids for rice, pasta, and cereal. Label each bin clearly. The uniform containers stack neatly and the lids keep out pantry moths. Bulk buying saves money; smart bulk storage saves sanity.
22. The One-Month Challenge: Tweak & Refine
Live with your new pantry system for one month, then make adjustments. This final pantry remodel step is crucial — what works in theory may need tweaking in practice. You’ll discover that the soup cans fit better on a different shelf, that the snack bin is too small, or that you need more space for baking supplies. A pantry is a living system.
No pantry remodel is perfect on the first try. After a month of use, note the friction points. Move zones. Add more bins. Remove unnecessary shelves. A good pantry evolves with your cooking habits. The goal is not a magazine-perfect photo but a system that works for your actual life. Be willing to change what isn’t working. The best pantry is one you use happily every day.
📦 Shelf & Sifter Blueprint: 5 Essential Rules for a Successful Pantry Remodel
- 📏 Measure, Measure, Measure: Before buying a single bin or shelf, measure your pantry’s width, depth, and height. In pantry remodel, a bin that’s 1 inch too deep or tall is useless. Note the distance between shelves and the depth of each. Measure your tallest cereal box and your shortest spice jar. Measure your largest bag of flour. Measure twice, buy once, and never assume standard sizes will fit. A tape measure is your most important tool.
- 🏷️ The FIFO Principle (First In, First Out): Organize your pantry so the oldest items are used first. In pantry remodel, this means placing new purchases at the back of the shelf and moving older items forward. Use tiered shelves for cans, pull-out drawers for jars, and clear bins for snacks. Label containers with purchase or expiration dates. FIFO saves money, reduces waste, and ensures your pantry is always fresh, like a garden harvested in rotation.
- ⚖️ Weight Distribution: Place heavy items (canned goods, jars, bulk flour) on lower shelves or in pull-out drawers. In pantry remodel, this is both a safety issue and a stability issue. Light items (snacks, pasta boxes, cereals) live on higher shelves. Never store heavy glass jars above shoulder height. A falling jar can break toes or worse. Respect gravity, and your pantry will be safer and easier to use.
- 🧩 Uniform Containers Rule: For a visually calm pantry, use matching containers wherever possible — same material (clear acrylic, glass, or baskets), same shape (square to save space), same lid system. In pantry remodel, uniformity reduces visual chaos and makes finding things easier. You don’t have to decant everything, but what you do decant should coordinate. The repetitive shapes create rhythm, like rows of wildflowers all facing the sun.
- 🔄 The Weekly Reset Habit: Spend 5 minutes each week tidying your pantry — pushing items forward, checking expiration dates, wiping up crumbs. In pantry remodel, this small habit prevents the slow slide back into chaos. Set a recurring calendar reminder. Involve family members. A weekly reset takes less time than reorganizing from scratch every six months. Your pantry stays beautiful not because you’re perfect, but because you’re consistent.
Frequently Asked Questions
Q: How much does a typical pantry remodel cost?
Ans: Costs vary wildly in pantry remodel. A budget DIY remodel with new bins, labels, and paint can cost $100-300. A mid-range remodel with new wood shelves, lighting, and custom organizers runs $500-1500. A full renovation with new cabinetry, pull-out drawers, and professional installation can cost $3000-10,000+. Start with a budget and prioritize what will give you the most daily benefit. Often, new containers and good lighting make the biggest difference for the least cost.
Q: What’s the best shelving material for a pantry?
Ans: In pantry remodel, wood (plywood or solid pine) is the most popular choice — it’s strong, warm, and can be painted. Wire shelving is less expensive and allows air circulation but can sag under heavy cans and items can tip over. Melamine is durable and easy to clean. Metal shelving is industrial and very strong. For most home pantries, 3/4-inch plywood with a sealed edge or pre-finished wood shelves are the best balance of cost, beauty, and function.
Q: How do I organize a very small or narrow pantry?
Ans: For a small pantry remodel, maximize vertical space and use door racks. Install narrow shelves (8-10 inches deep) to prevent items from getting lost in the back. Use clear bins for small packets. Remove all packaging and decant into uniform containers. Use a magnetic spice rack on the wall. Install pull-out drawers on lower shelves. Consider removing the pantry door and replacing with a curtain to make the space feel larger. Every inch must earn its keep.
Q: What’s the best way to prevent pantry pests (moths, weevils)?
Ans: Prevention starts with a thorough pantry remodel. Decant flour, grains, and cereals into airtight glass or heavy plastic containers immediately upon bringing them home. Check packages for signs of infestation before buying. Use bay leaves or pheromone traps as deterrents. Clean shelves regularly with vinegar. Freeze new dry goods for 48 hours to kill any eggs. Good storage containers are your best defense. A pest infestation is a sign to re-evaluate your container system.
Q: Should I remove my pantry door entirely?
Ans: This depends on your space and style. In a pantry remodel, removing the door can make a small pantry feel larger and more accessible. It also forces you to keep the pantry beautifully organized because it’s always visible. However, you lose the ability to hide clutter on a busy day. Consider replacing a solid door with a glass-paned door, a sliding barn door, or a fabric curtain. Each option balances visibility and hide-ability differently. The best choice is the one that matches your tolerance for on-view organization.
Conclusion
You have journeyed through the abundant world of the pantry remodel — from clear glass jars and woven baskets to pull-out drawers and adjustable shelving. Each image whispered the same truth: a pantry is more than a closet. It is a statement of values — that you value good food, that you hate waste, that you believe order brings peace. Like a meadow lush with wildflowers, a well-organized pantry is a joy to behold and a pleasure to use. It saves you money, time, and the frustration of hunting for a can of tomatoes that should be right there.
Now it is your turn to empty those shelves. Go find matching bins, a label maker, and a clear spot on your calendar. Your pantry remodel doesn’t have to be expensive or happen all at once. Start with one shelf. Then one zone. Then the whole pantry. Before long, you’ll open the door and feel a deep sense of satisfaction — everything in its place, abundance visible, and the quiet hum of a system that works. Your pantry is waiting to be reborn. 🥫📦🏡